|
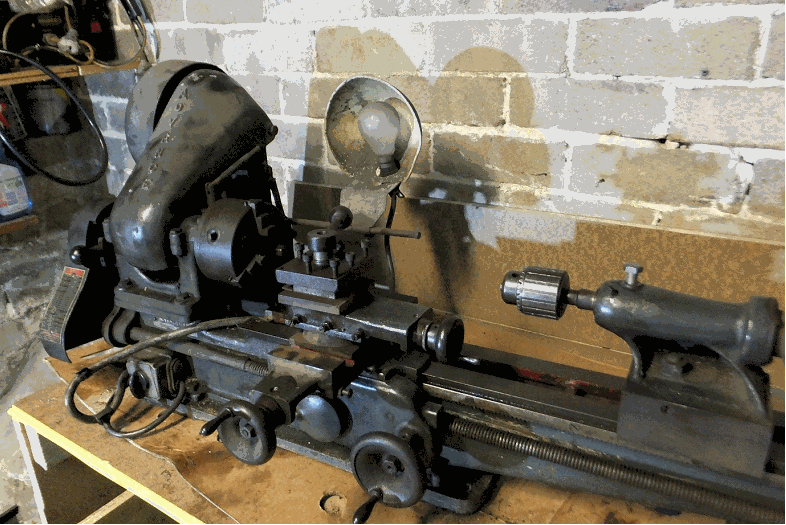
Stewart Advance lathe 1965 Condition when bought.
The lathe was in a mechanic's garage and had been used in the past for minor work. The condition was poor, and it could only do pretty rough work. It had not been oiled for years. The lathe had the original vee belts, lots of rust and had been grossly neglected.
The lathe was covered with steel shavings on the bed, in the change gears, inside the chuck, and in the air vents in the motor. The gap in the ways showed a complete history of use - mainly brass. The chuck and the ways were rusty, and all painted areas were covered in grey dirt. The chuck barely turned, the carriage was jammed, and the backgear could not be engaged due to shavings everywhere. It was in a bad way.
On the plus side, the lathe was complete with all the change gears, the backgear was complete, the carriage and slides were complete. It also had the original 1965 1/4hp motor. The only missing items were the half-nuts and arms from the carriage feed.
Fixing things
Step 1 The motor.
I started with the motor due to fear of electrocution from the spirals of metal both inside and outside the motor. Getting the motor apart is straightforward, but it was obvious reassembly would require changes.
- cleaning the stator was OK, except washing reduced the insulation resistance to 10kohms. Two hours baking in the kitchen oven at 70degC got about 1megohm (barely OK), so I decided to cook a bit more and add some fresh varnish. It should be Isonel but urethane can suffice, depending on temperature. A nice hot stator from the oven will allow varnish to soak in better - just keep on painting it on until the varnish runs off. The varnish sets quickly, and when cool the insulation was 10megohm, and rising. Lucky.
- the rest of the motor was simple to clean and reassemble, except for repairing the wiring to the centrifugal switch. BTW, the 20 starts per hour capacitor was in perfect condition.
- I tested the motor on a variac. No earth leakage problems and only 1Amp run current. OK
Step 2 Headstock
This Stewart Advance has cast iron headstock bearings, machined into a single headstock casting. The spindle fits into the hole (no separate bushes) and the adjustment uses bolts which bend the cast iron to reduce the gap in the slot. Thrust is a ball bearing race near the change gears. It's a case of hardened steel spindle running against soft cast iron.
- After much oiling, the stream of grey sludge from the spindle bearing began to run clear. The sludge was worn cast iron. The oily sludge was attracted to a magnet - cast iron dust.
- Remove chuck and clean. Yes possible, but not easy after 60 years of seized 10TPI thread.
Question - why don't people ever put never-seize on these threads?
- The wear on the spindle bearing could be adjusted out (up to a point) but the thrust bearing remains noisy and may not be replaced. Runout at the chuck was about 2 thou. and using the morse taper inside the spindle the runout is much less.
I started removing the spindle (undo threaded collar, drive pulley lock screw) but when the spindle stopped moving (something was hitting the chuck side bearing) I gave up.
A good way to extract the spindle is to slide it out using a puller (threaded bar, nut one end and wood with clearance on chuck end) and tighten the nut to pull the spindle out. Nobody mentioned the press-fit collar on the spindle (under the drive pulley) and the keyway from the backgear onto the spindle. TOO HARD. It moved a bit, then jammed. NOT DONE. I suspect that the key in the spindle needs to line up with something in the bearing housing.
Step 3 Ways and slides
The ways were awful. After a lot of cleaning and polishing, everything moves, everything works, and the lathe can turn brass, mild steel and copper. But…
- The saddle and the ways have severe wear. The machining marks under the tailstock are not to be seen anywhere along the ways. Moving the carriage close to the chuck makes it jam. The result is a lot of chatter when cutting due to worn sections of the ways.
- Restoring the lathe is at a crossroad. The ways have some wear on the top face, but the dovetail sides have worn sections which make accurate gib adjustment impossible.
The carriage also needs work. Whatever is done to the ways/bed also needs to be done to the matching areas of the carriage. The cross slide is bearable, but the compound is flimsy and needs work, especially on the swivel mount.
Fixing the carriage and bed (and realigning the headstock and tailstock) needs to be done on another machine. Getting the cross-slide going OK needs similar machining / grinding.
- Whilst testing the flatness of the ways, I noticed that the dial gauge went crazy when the motor was running due to vibration. This would be a problem related to the lightness of the lathe overall - it might be fixable.
Step 4 Remaking the half-nuts
These are usually bronze. The Stewart Advance uses a 5/8 inch LH 8TPI ACME thread leadscrew. Surprisingly, taps are readily available, so new half-nuts can be made easily. Just tap a piece of brass or bronze, cut in half and then fit said half-nuts to new arms. Get the arms and half-nuts to mount onto the 2 studs on the lathe apron and ensure that the engaging handle linkage works correctly.
I wish it was that easy. A mill would have come in handy.
Step 5 test
For the first time in 60 years (maybe) the carriage feed works. The gears work OK and the leadscrew does not have any problems. At high speed (900 rpm) the spindle bearings do get warm, and clearances reduce when the bearings are hot. Bearing adjustment is tricky.
Adding a decent motor starter makes the Stewart Advance feel a bit like a normal lathe.
Step 6 Making improvements
Assuming that ways / bed / carriage are restored (within machining limits!!), the question arises what should be improved?
- The source of vibration needs to be found and fixed (maybe headstock mount).
- The tool-post is not terrific. It is a Myford part with some mounting differences. Replacing the tool-post with a QC type (and maybe getting rid of the compound slide) is better.
- I have made covers to keep swarf and chips out of the ways, carriage and the motor, but these could be improved. Using a lot of cutting oil is very messy.
- The 3-jaw chuck is worn but serviceable. It would be helpful to use a 4-jaw independent chuck for many jobs (the first lathe I ever used only had a 4-jaw chuck).
- Alignment of the headstock, carriage and tailstock needs thorough testing.
Matching the height of the chuck to the tailstock after any work to the bed is needed.
Conclusion (for now)
Reviewing the repairs of the lathe thus far, I cannot help thinking that some work is wasted effort. This is because the end-result is still a small vintage lathe. It is curved and beautiful, but I doubt if rigidity will ever be great - the ways don't have the Vee shape to align the carriage during machining work.
The real question is: - is this a working lathe? It's not a toolroom lathe and it never was. One conclusion is that newer "Mini-Lathes" do have better design, stronger materials and are suitable for modelling work, but they are ugly. Maybe the best solution is to leave the Stewart Advance as a working collection piece. It does that quite well.
Bill Rannard 18 May 2024
|
|